Designing a Three-Tier Architecture in AWS

I'm Varchasv, a Data Engineer working on enterprise data integration.
Currently on a 90-problem challenge to level up my technical skills and switch to a more development-focused role.
What I'm doing:
- Solving 2 Leetcode problems daily (SQL + DSA).
- Blogging about each problem.
- Building in public.
My Goal - Land a better data engineering role by mid-2026.
Follow my journey !!
A Three-Tier Architecture is segmented into three parts:
Presentation Layer (Front-End) - Acts as the UI and handles the user interaction.
Application Layer (Back-End) - Responsible for Data processing and business logic.
Data Layer (Database) - Manages data storage and data retrieval.
This Architecture promotes the separation of concerns and facilitates easy updates or modifications to specific layers without impacting others.
It is a shift from the monolithic way of building an application where the frontend, the backend and the database are both sitting in one place.
AWS Services used
EC2 (Elastic Computer Cloud)
Auto Scaling Groups
VPC (Virtual Private Cloud)
ELB (Elastic Load Balancer)
Security Groups
Internet Gateway
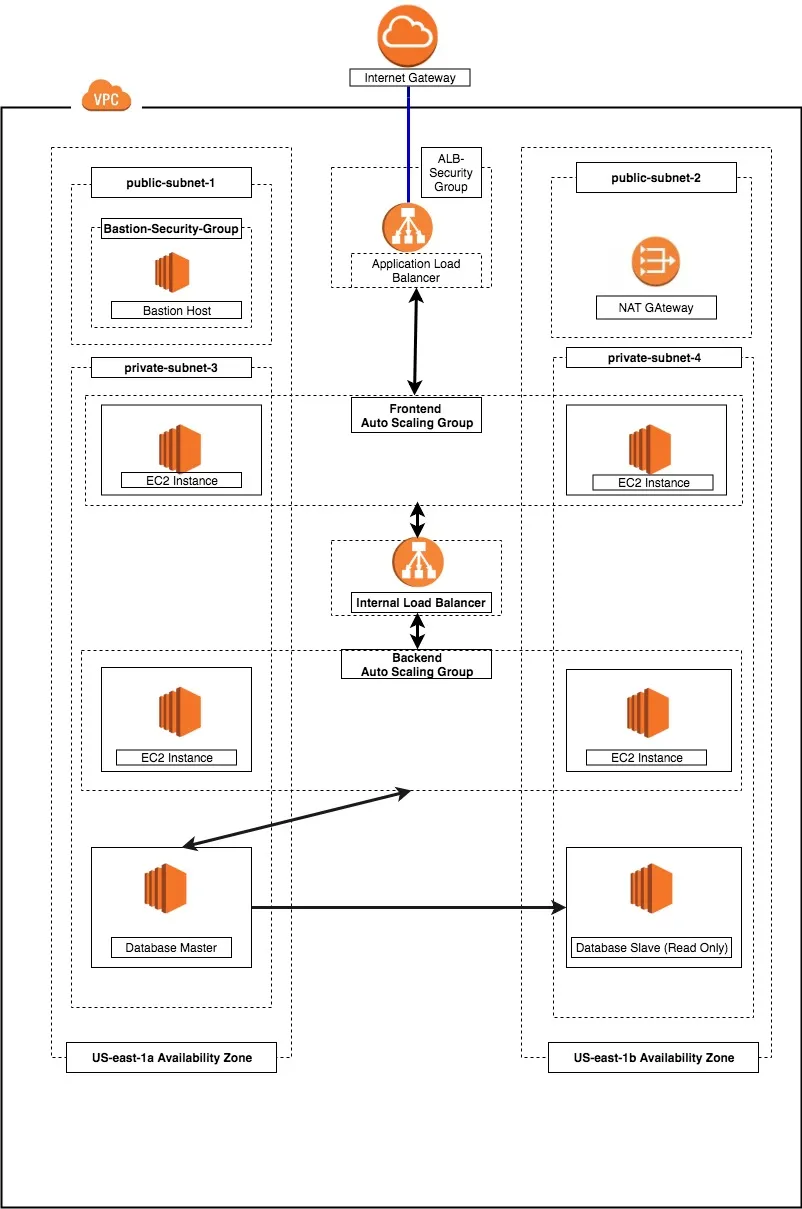
Visual Representation of the Architecture
What we are trying to achieve?
Modularity: It helps us manage each part of the application independently and it also helps us recover quickly from an unexpected disaster by focusing solely on the faulty part.
High Scalability: Every tier of this architecture can scale automatically when the traffic and number of requests are increased. This can easily done by using Auto Scaling groups as they scale up or down according to the network traffic and demand.
High Availability: An infrastructure that is in multiple regions is highly available as if there is an earthquake in the location of one region, other regions can still be active and that results in better uptime of the application.
Security: We want an infrastructure that is secure from hackers and others with malicious intent. Therefore, our application will be inside a private subnet in the VPC and to access it we are gonna use a bastion host for remote SSH and a NAT gateway.
Fault Tolerant: We want our infrastructure to adapt to any unexpected changes to the traffic and fault. To achieve this, we are gonna use a redundant system.
Step-by-Step Tutorial
Step-1: Setup the VPC
VPC stands for Virtual Private Cloud (VPC). It is a virtual network where you create and manage your AWS resource in a more secure and scalable manner.
Click on the Create VPC button.
Give your VPC a name and a CIDR block of 10.0.0.0/16.
Step-2: Setup the Internet Gateway
The Internet Gateway allows communication between the EC2 instances in the VPC and the Internet.
Click on Create Internet Gateway button and Give it a name.
Select the internet gateway and Click on the Actions button.
Select the Attach to VPC option and attach your VPC to it.
Step-3: Create 4 Subnets
The subnet is a way for us to group our resources within the VPC with their IP range. A subnet can be public or private. EC2 instances within a public subnet have public IPs and can directly access the internet while those in the private subnet do not have public IPs and can only access the internet through a NAT gateway.
Search for Subnets and create 4 subnets as follows:
demo-public-subnet-1 | CIDR (10.0.1.0/24) | Availability Zone (us-east-1a)
demo-public-subnet-2 | CIDR (10.0.2.0/24) | Availability Zone (us-east-1b)
demo-private-subnet-3 | CIDR (10.0.3.0/24) | Availability Zone (us-east-1a)
demo-private-subnet-4 | CIDR(10.0.4.0/24) | Availability Zone (us-east-1b)
Step-4: Create two Route tables
Route tables is a set of rule that determines how data moves within our network. We need two route tables; a private route table and a public route table. The public route table will define which subnets will have direct access to the internet (i.e. public subnets) while the private route table will define which subnet goes through the NAT gateway (i.e. private subnet).
Navigate over to Route Tables and Click on the route table button.
Name these Route tables as public and private accordingly:
demo-public-RT
demo-private-RT
Select a RT and choose the Subnet Association tab.
Go to Edit Subnet Associations and add public subnets to the public RT and the same for private subnets and RT.
Now, Select Public RT choose the Routes tab and add the Internet Gateway rule.
Step-5: Create the NAT Gateway
The NAT gateway enables the EC2 instances in the private subnet to access the internet. The NAT Gateway is an AWS-managed service for the NAT instance.
Please ensure that you know the Subnet ID for the demo-public-subnet-2. This will be needed when creating the NAT gateway.
Go to the NAT Gateways page and click on Create NAT Gateway.
Choose the subnet and click on Create a NAT Gateway.
Now select the private RT and click on Edit Routes.
Add the nat rule and Click on save routes.
Step-6: Create Elastic Load Balancer
From our architecture, our frontend tier can only accept traffic from the elastic load balancer which connects directly with the internet gateway while our backend tier will receive traffic through the internal load balancer. The essence of the load balancer is to distribute load across the EC2 instances serving that application. If however, the application is using sessions, then the application needs to be rewritten such that sessions can be stored in either the Elastic Cache or the DynamoDB.
Search for Load Balancer page and click on Create Load Balancer.
Select the Application Load Balancer and Click on the Create button.
Configure the Load Balancer with a name. Select internet facing for the load balancer that we will use to communicate with the frontend and internal for the one we will use for our backend.
Under the Availability Zone, for the internet-facing Load Balancer, we will select the two public subnets while for our internal Load Balancer, we will select the two private subnets.
Under the Security Group, we only need to allow ports that the application needs. For instance, we need to allow HTTP port 80 and/or HTTPS port 443 on our internet-facing load balancer. For the internal load balancer, we only open the port that the backend runs on (e.g.: port 3000) and make such port only open to the security group of the frontend. This will allow only the front end to have access to that port within our architecture.
Under the Configure Routing, we need to configure our Target Group to have the Target type of instance. We will give the Target Group a name that will enable us to identify it. This is will be needed when we will create our Auto Scaling Group.
Step-7: Create Launch Configuration
Click on Create Launch Configuration.
Choose a AMI or create your own AMI.
Choose an appropriate instance type (t2.micro for free tier).
Name the Launch configuration and copy the commands from Advanced Details -> User Data.
Again under the security group, we want to only allow the ports that are necessary for our application.
Click on Create Launch Configuration.
Step-8: Create Auto Scaling Groups
Click on Create Auto Scaling Group
Make sure your Group looks like this:
- Under the Configure scaling policies, we want to add one instance when the CPU is greater than or equal to 80% and to scale down when the CPU is less than or equal to 50%. Use the image as a template.
- Click on Create Auto Scaling Group button.
Step-9: Bastion Host
The bastion host is just an EC2 instance that sits in the public subnet. The best practice is to only allow SSH to this instance from your trusted IP.
To create a bastion host, navigate to the EC2 instance page and create an EC2 instance in the demo-public-subnet-1 subnet within our VPC. Also, ensure that it has a public IP.
We also need to allow SSH from our private instances from the Bastion Host.
Step-10: Deleting all the resources
You need to stop and delete all the resources such as the EC2 instances, Auto Scaling Group, Elastic Load Balancer etc you set up. Otherwise, you get charged for it when you keep them running for a long.
Final Words
To sum up, the adoption of the Three-Tier Architecture in DevOps offers a structured and efficient approach to software development and deployment.
It promotes modularity, scalability, and smoother integration of DevOps practices.
By separating concerns into distinct layers and leveraging automation, teams can achieve quicker releases, improved fault tolerance, and optimized resource utilization.
While challenges exist, the benefits make this architectural approach a valuable asset for modern development endeavours within a DevOps context.